Grove - Recorder v2.0
Introduction
Grove - CRecorder v2.0 is a upgraded recorder with enriched features. It can record 8-20 seconds[1] audio with high-quality and natural voice. In addition, it also gets sound volume control and playback functions. With MCU such as Seeeduino or Arduino board, you can prototype various applications quickly with user-friendly interfaces.
[1] Recording time could be customized(if you require) by replacing different resistor the solution to do this will be described in later sections.
Version Tracker
| Product revision | Release date | Support status | Notes |
|---|---|---|---|
| V1.0 | Apr 2014 | Supported | - |
| V2.0 | Oct 2015 | Mainstream support |
|
Features
- Easy-to-use with sound volume control, record, playback functions and grove interfaces.
- Easy to be programmed for plenty of applications with MCU.
- Automatic power down mode, variable recording and playback duration, non-volatile storage.
- Low power consumption.
- Shipped with a speaker (8Ω/2W).
Tip
More details about Grove modules please refer to Grove System
Application ideas
- Toys.
- Alarm.
- Short-duration-echo required applications.
Specifications
| Parameter | Value |
|---|---|
| Operating voltage | 3.3~5.0V(DC) |
| Ripple(at Max power) | ≤ 50mV |
| Recording duration(default) | 12 seconds(MAX value)[2]. |
| Playback duration(default) | 12 seconds(MAX value). |
| Sample rate | 53 kHz |
| Chip | ISD1820PY(Datasheet), NS8002(Volume Amplifier) |
Platforms Supported
Arduino Wio BeagleBone Raspberry Pi LinkIt ONE 


Caution
The platforms mentioned above as supported is/are an indication of the module's hardware or theoritical compatibility. We only provide software library or code examples for Arduino platform in most cases. It is not possible to provide software library / demo code for all possible MCU platforms. Hence, users have to write their own software library.
| Arduino | Wio | BeagleBone | Raspberry Pi | LinkIt ONE |
|---|---|---|---|---|
Caution
The platforms mentioned above as supported is/are an indication of the module's hardware or theoritical compatibility. We only provide software library or code examples for Arduino platform in most cases. It is not possible to provide software library / demo code for all possible MCU platforms. Hence, users have to write their own software library.
[2]You can replace the resistor shows as following to change recording duration.
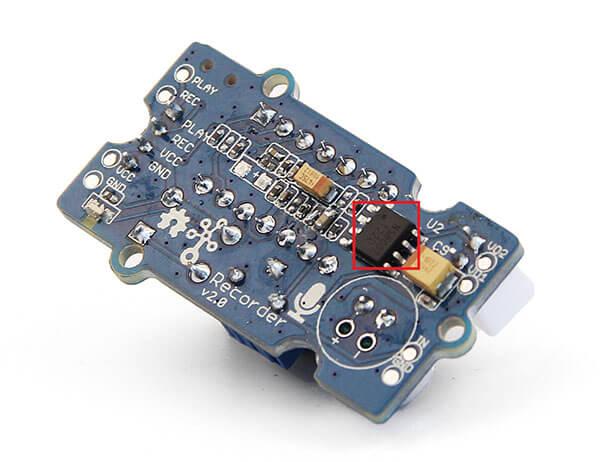
Red rectangle marked area
Note
Playback duration will be same with Recording duration as it changes. Different kinds of resistor will lead different Recording duration as the following table shows.| ROSC | Duration | Sampling Frequency | Input Bandwidth |
|---|---|---|---|
| 80 KΩ | 8 secs | 8.0 KHz | 3.4 KHz |
| 100 KΩ (default) | 10 secs | 6.4 KHz | 2.6 KHz |
| 120 KΩ | 12 secs | 5.3 KHz | 2.3 KHz |
| 160 KΩ | 16 secs | 4.0 KHz | 1.7 KHz |
| 200 KΩ | 20 secs | 3.2 KHz | 1.3 KHz |
Hardware Overview
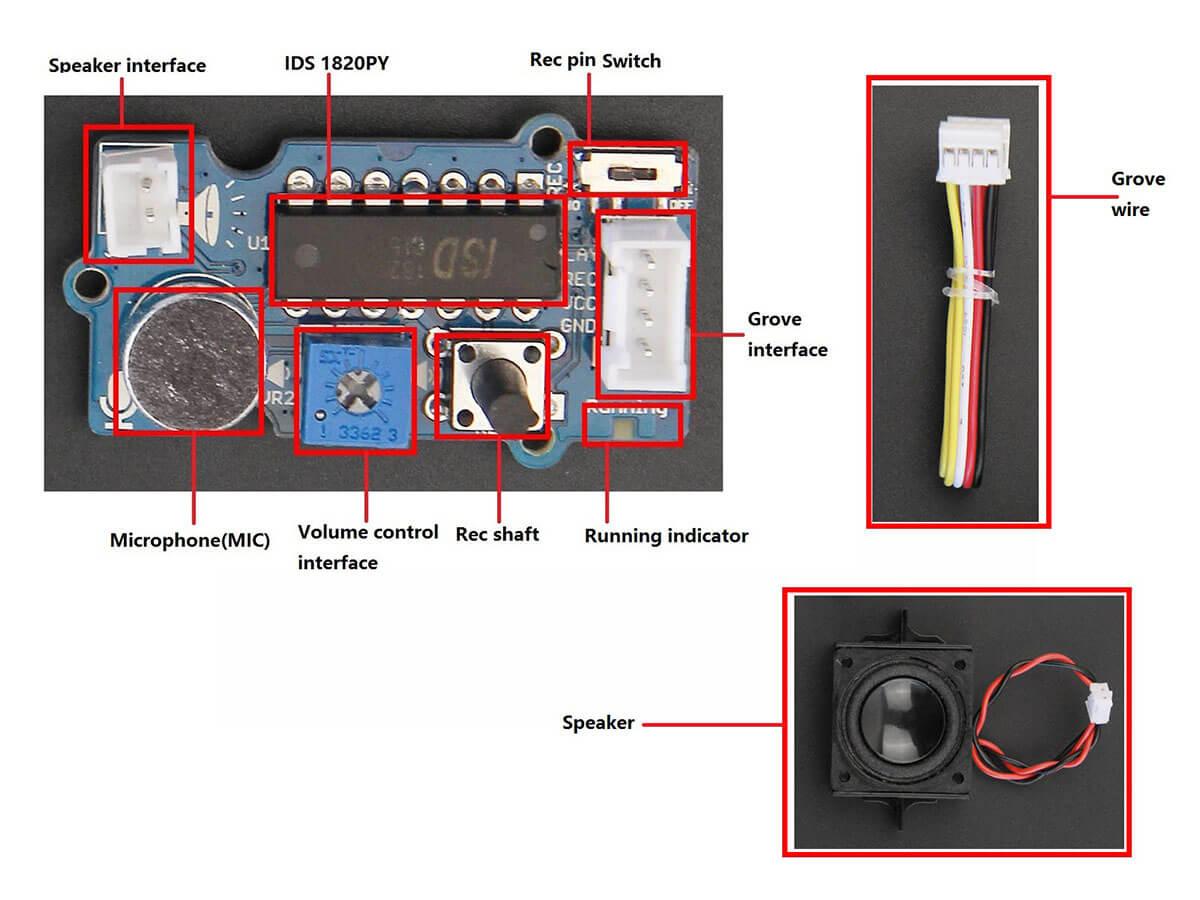
Grove interface
Connect main control board such as Seeeduino board with Grove - Recorder.
Speaker interface
Connect Grove - Recorder with speaker.
Rec shaft
Start recording.
Volume control interface
Control volume for speaker.
MIC
Microphone for recording.
IDS 1820PY
Microcontroller.
Running indicator
Light on while you are recording. Light out as you stop recording or recording time exceeds record duration.
Rec pin Switch
You can switch Rec pin ON/OFF, so you can disable or enable MCU controlled recording.
Grove wire
Connect main control board with driver board.
Speaker
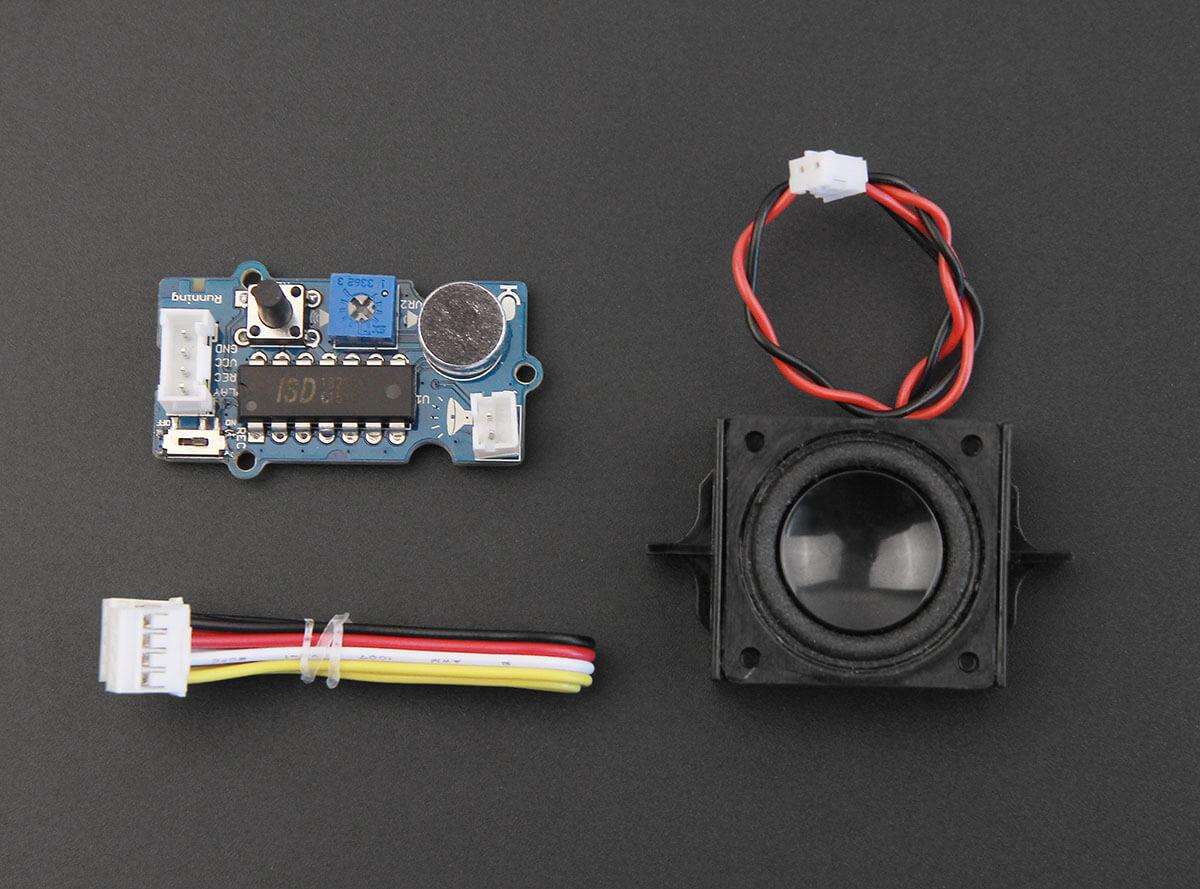
Parts list
| Parts name | Quantity |
|---|---|
| Grove - Recorder v2.0 | 1 PC |
| Grove wire | 1 PC |
| Speaker | 1 PC |
Get started
Materials required
- Seeeduino x 1
- Grove - Button x 1
- Grove wire x 1
Preparations
Refer to the following guides to build a appropriate IDE:
Note
We have used Seeeduino in this case.Hardware connections
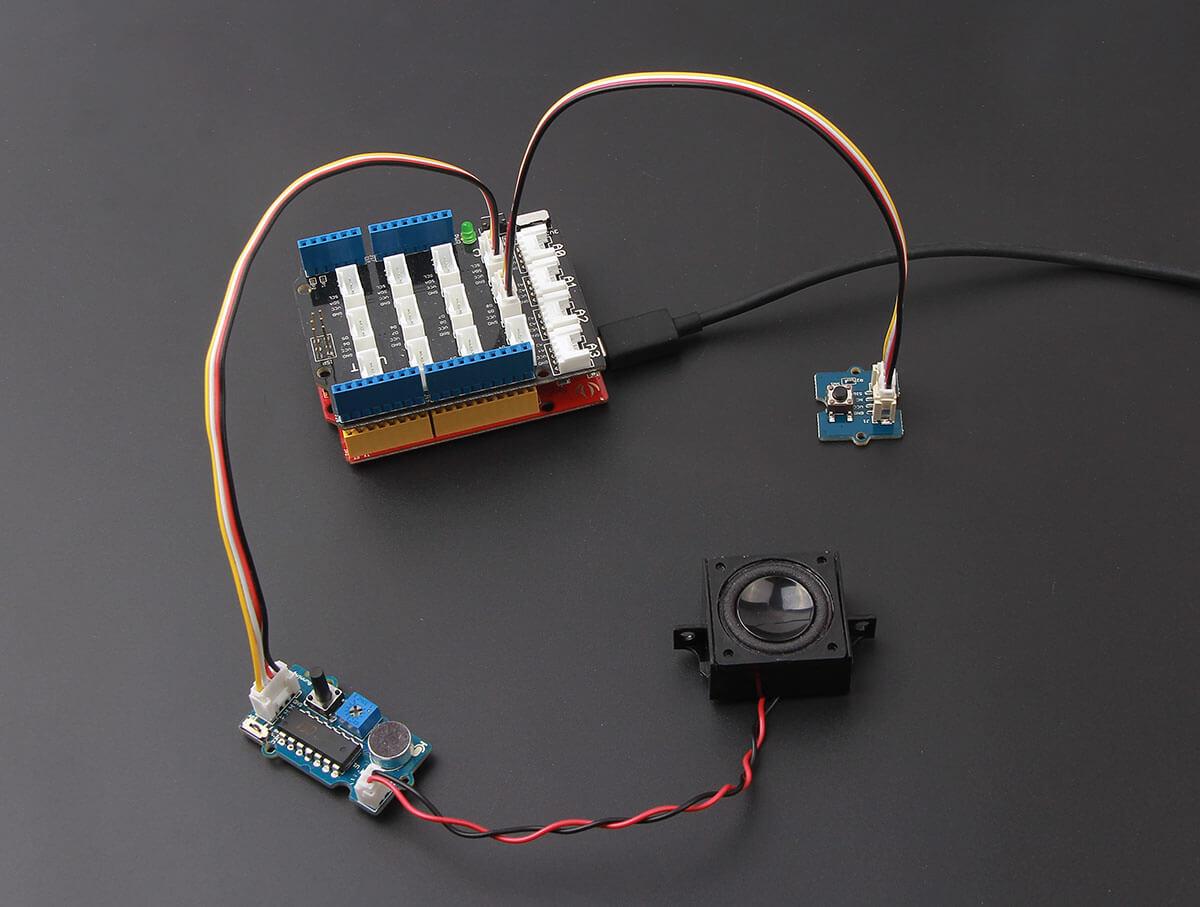
- Connect all modules as above figure shows.
- Grove - Button > D2
- Grove - Recorder > D7
Software Work
Test code as below, copy to your Arduino IDE, then click Upload(CTRL+U) to upload code to your Arduino.
// demo for Grove - Recorder

const int pinButton = 2;
const int pinRec    = 7;


void setup()
{
    pinMode(pinButton, INPUT);
    pinMode(pinRec, OUTPUT);
}

void loop()
{
    if(digitalRead(pinButton))      // button pressed
    {
        digitalWrite(pinRec, HIGH);
        delay(200);
        digitalWrite(pinRec, LOW);
        while(digitalRead(pinButton));  // until button release
    }

    delay(10);
}
Test it
- After connection works and software works finished, press shaft Rec to start recording.
- Then press button on Grove - Button to playback.
- You can also adjust volume with Philip screw driver.
Resources
Help us make it better
Thank you for choosing Seeed. A couple of months ago we initiated a project to improve our documentation system. What you are looking at now is the first edition of the new documentation system. Comparing to the old one, here is the progresses that we made:
- Replaced the old documentation system with a new one that was developed from Mkdocs, a more widely used and cooler tool to develop documentation system.
- Integrated the documentation system with our official website, now you can go to Bazaar and other section like Forum and Community more conveniently.
- Reviewed and rewrote documents for hundreds of products for the system’s first edition, and will continue migrate documents from old wiki to the new one.
An easy-to-use instruction is as important as the product itself. We are expecting this new system will improve your experience when using Seeed’s products. However since this is the first edition, there are still many things need to improve, if you have any suggestions or findings, you are most welcome to submit the amended version as our contributor or give us suggestions in the survey below, Please don’t forget to leave your email address so that we can reply.
Happy hacking
댓글 없음:
댓글 쓰기