Changes log 2013-12-27
-added note about using the Z property
Changes log 2013-12-19
-reduce or eliminate 'geek speak'
-make variable names more natural and readable
-finish documentation
-updated aia and apk files to reflect the changes above
INTRODUCTION:
Here I will describe the entire process for us to create this game app and we will add a scene for the user to drag the Ladder Truck left and right while watching the wheels roll.
Remarkably, this is very simple to do - much easier than the drag-and-drop process and it uses one additional Procedure block!
Here is what we will be making:
> YouTube video <
IN THE BEGINNING...
Before you can do any programming, you need an idea for the app.
In this example app we will build a Ladder Truck and make it roll left and right.
This will take two scenes - a 'puzzle scene' and a 'rolling scene'
puzzle scene:
The model for how this scene is to work is based on a 'dress-me doll' game where the doll clothes are dragged to the doll, or any game where objects are dropped and snap into position.
This is generally referred to as drag-and-drop.
In this case, the parts will be dragged to an assembly area and dropped to build the Ladder Truck.
When they are touched/dragged, a sound effect will play.
Once the Ladder Truck is built, the red light will begin flashing and the scene will switch to the rolling scene...
rolling scene:
In this scene the user will drag the Ladder Truck left and right with their finger and watch the wheels roll with a 'beautiful' country scene in the background.
Wherever they touch on the Ladder Truck a sound effect will play also.
Making the parts to be assembled:
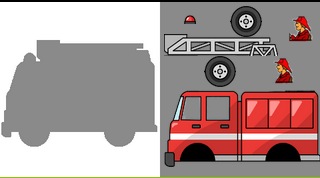
We have searched Google Images for a suitable clipart picture of a Ladder Truck:

Now we need to take it apart using any image editing software. (I use Gimp.)
We now have five parts (the rear light will not be used):


We want to have some firefighters inside the truck so we can have them say hello or other things.
We find Firefighters in another truck image, resize and crop them to fit as Driver and Crew:


This gives us a total of seven parts.
We want the Light to blink so a darkened a copy of the Light is needed to swap with the other one inside a Timer block.

Making the BackgroundImage for the puzzle scene:
We want the puzzle scene's background image colored a medium gray initially and 480 x 270 pixels.
We place a complete truck in a layer over the left side in the image editor and with the background layer selected, fill the area outside the truck with white.
We leave the right half of the image gray.
We remove the truck layer and the image appears like this.
We save the image under the name EmptyPuzzle.png then create a Canvas set to 480 x 270 pixels and insert this image as the Canvas BackgroundImage.
Making the BackgroundImage for the rolling scene:
This image will also be 480 x 270 pixels and will contain a background for the Ladder Truck to roll in front of.
It could contain scenery of any kind, but in this case, we want a simple grassy plain with mountains in the background:

We save this image for use later in the rolling scene under the name Desert.png
With the puzzle background visible in the Canvas, we create seven ImageSprites to hold the parts.
They are arranged randomly on the right side of the canvas.
They are named Body, FrontWheel, RearWheel, Driver, Crew, Ladder, and Light.
We find that we have to use the Companion App to nudge and adjust the positions of the ImageSprites X and Y property values as they don't always stay where we place them in the Screen Viewer.
At this time we set the Z property values of the parts such that the wheels (Z=3) will be in front of the body (Z=2) and the Driver and Crew (Z=1) will be behind the body (inside the truck).
The windows of the body have been made transparent to make the people visible also.
Our Plan is to keep a list of X and Y Property values for each part when they are on the right side of the Canvas when the EmptyPuzzle.png BackgroundImage is visible.
We will label the columns for these BeginX and BeginY and store them in a Google Docs > Sheet <.:(click 'Sheet' to see the data)
Once you have the BeginX, BeginY for each part, we need to move the parts to the left side of the puzzle and place them carefully in their final positions in the assembled Ladder Truck.
Again we find the Companion App helps us to nudge the parts into the correct locations by changing the X and Y values as needed.
Now with the Ladder Truck assembled, we create two more columns in our > Sheet < labelled EndX and EndY and enter the final positions for each part by selecting each one in the Designer Viewer and looking at the X and Y values.

When the user drops a part on the left side of the screen, we will have it jump to it's EndX, EndY position.
A final column in the Sheet is needed---
For the 'rolling scene' we need to know where each part was relative to the body of the Ladder Truck.
That is because we want to be able to drag the body left and right and have the other parts move along with it.
This means that we need to know each part's X position relative to the X position of the Body.
We can ignore any movement in the Y direction as only horizontal movement will be allowed.
We know that when the Body X value changes by 5 pixels as it is dragged by a finger, the other parts' X values must change by that amount as well.
So what is needed is to know the offset in pixels from the Body X value to each part's X value.
Subtracting the Body X value from a part X value gives us the offset.
We enter the formula for this into the Sheet: such that <partname>'s Xref = <partname>'s EndX - Body's EndX to calculate the value for each Xref (See: Sheet)
Now, after the Ladder Truck is built in the 'puzzle scene', the Body can be dragged left and right in the 'rolling scene' and use the values from the Xref column to move each part the same amount.
Using the spreadsheet BeginX, BeginY values we move the parts back to their starting positions.
The Google Docs Sheet containing BeginX,Y EndX,Y and Xrel values

Adding other media files to the project:
We thought it would be fun if, when an item is touched, it made a sound effect. An example is the Light making a siren and honking sound when touched.
We searched FreeSounds.org for sound effects for each of the seven parts and edited them as necessary with the Audacity audio editor to keep everything under six seconds.
We also used Audacity to record our voice for the firefighters and to recite the title at the start of the app.
Once these preliminary layout tasks were completed, we were ready to begin snapping blocks together!.
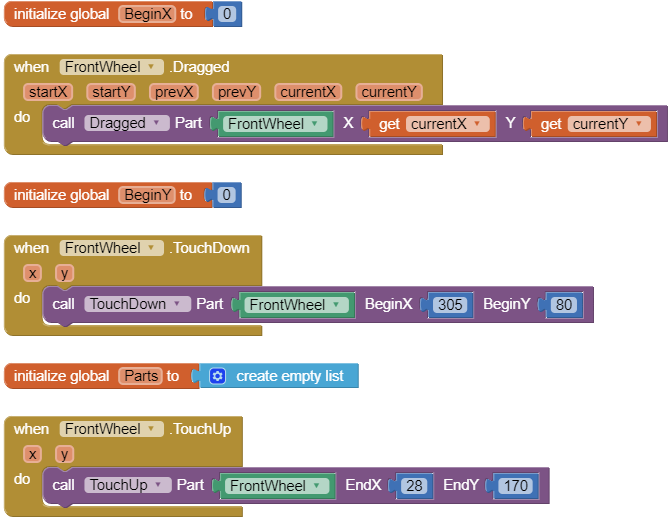
Global variables and Screen1.Initialize for drag-and-drop and rolling simulation:
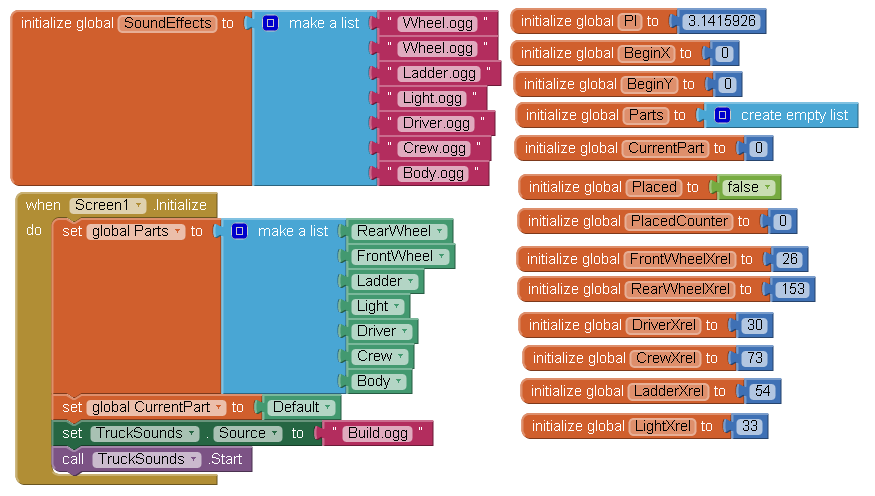
The component blocks for the parts of the truck are stored in a list and accessed via the global Parts variable in the Screen1.Initialize event block.
These are used by the 'puzzle scene' Procedures and for selecting audio files.
global CurrentPart containx the component value of whatever ImageSprite is currently being dragged.
The Default ImageSprite block refers to a hidden/empty ImageSprite that is used only to initialize CurrentPart with a proper value.
This insures that when CurrentPart is being tested against other component part values in the app an error will not be thrown.
It has no blocks in the blocks viewer.
When Screen1.Initialize executes, the Build.ogg sound file (my voice) is played: 'Build the Ladder Truck, then make it go!'
This is played with the Player component instance TruckSounds.
The global SoundEffects variable contains the list of sound effects used for each of the parts of the truck when they are touched.
They are in the same order as the Parts list items so they share a common index.
BeginX and BeginY will hold the starting X and Y property values for the part that is currently being dragged.
PlacedCounter counts how many parts have been placed. Once seven parts have been placed, blocks to setup the 'rolling scene' are executed.
If all parts have been placed, then the logic Placed variable is set to true to guide the execution of blocks allowing the truck to be moved with a finger in the 'rolling scene'.
The <partname>Xrel variables are used to determine what to set each part's X property value to relative to the current X position of the truck Body part.
When the truck Body is dragged with a finger, the other six parts must also move along with it.
These offset values are added to the current X value of the Body ImageSprite to place each part when the Body is moved. In this way the truck and it's parts can move along as one object.
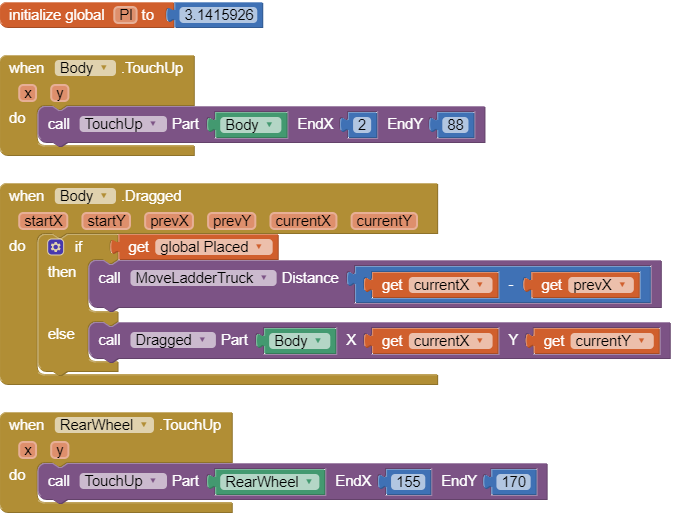
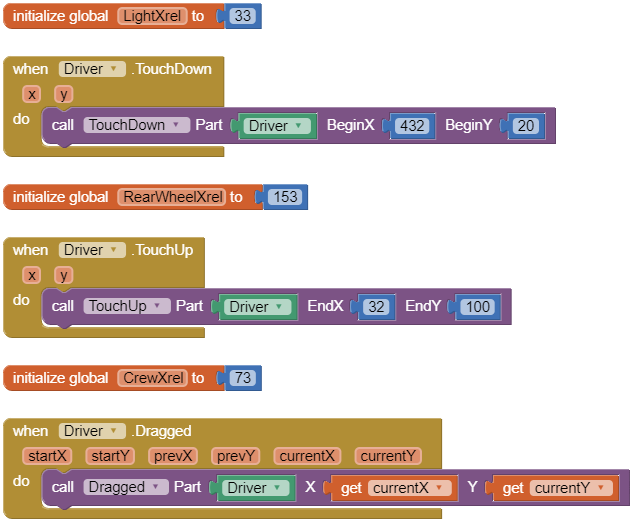
TouchDown, Dragged, and TouchUp Events:
Each of the seven Ladder Truck parts has an event block: <partname>.TouchDown, <partname>.Dragged and <partname>.TouchUp.
These event blocks use the shared procedures TouchDown, Dragged and TouchUp to handle the drag-and-drop behaviors.
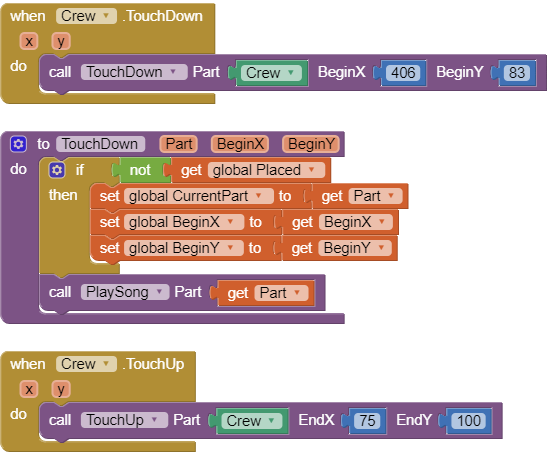
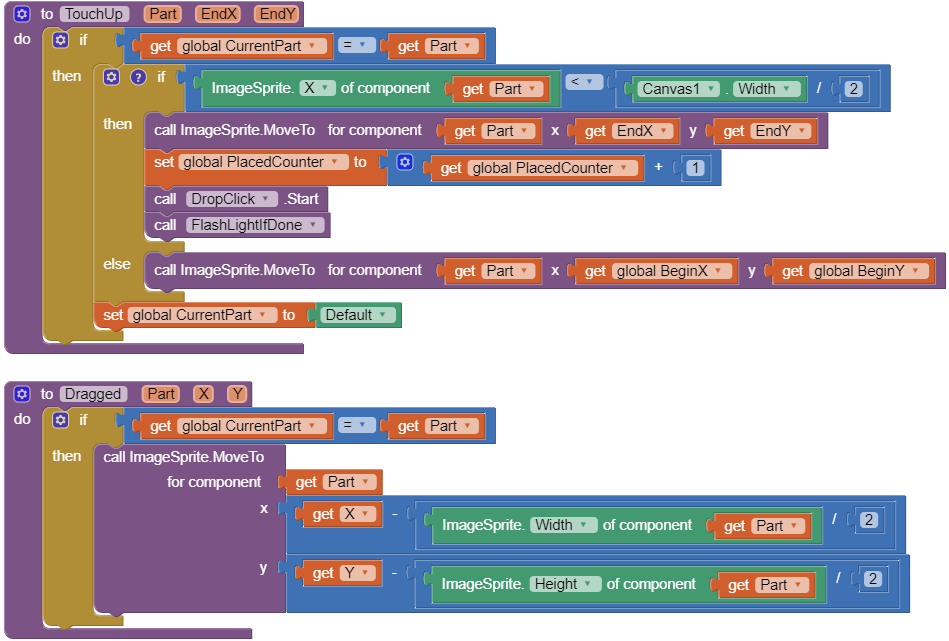
TOUCHING:

Looking at the Body.TouchDown block we see that it calls a TouchDown Procedure and passes the value for the Body part and it's BeginX, BeginY values.
The BeginX and BeginY values were either taken from the > Sheet <.
The TouchDown Procedure block contains a test of the Placed variable to determine if the truck has been built yet, and if not the values of CurrentObject, BeginX and BeginY are set for the Body's Object in preparation for it to be dragged.
If Placed contains false then the if block is skipped since the app is in the 'rolling scene'.
If Placed contains true then the current scene is the puzzle scene so we need set this part as the CurrentPart (to avoid Sprite cannibalism!) and to set the global BeginX and BeginY values.
These values will be used to move the part back to it's BeginX and BeginY positions if the user drops the part on the right side of the Canvas during the puzzle scene..
In either of the cases above, the sound effect for the part is played with the PlaySong procedure.
PlaySong gets the sound file from the SoundEffects list that is associated with the current Part identifier and plays it.
Note: Which sound to play is linked with the location of the Part value in the Parts list. This is because the Parts list and the SoundEffects lists have the same number of elements and the sound effect for each part is located in the same position in the SoundEffects list as each part's location is in the Parts list. So the two lists are linked together by a common index.
At this point the user has touched a part.
The next step is dragging...
DRAGGING:

When the user drags a part with their finger the part's Dragged event block is triggered.
---
Note:
When the user drags a part over another part, by default, that other part will be picked up and dragged along as well as if the user's finger were a magnet passing over metal parts.
This has come to be know in App Inventor circles as 'sprite cannibalism' and is usually not desired (unless your app is dragging a magnet over metal parts :)
To avoid this undesired behavior, it is necessary for the app to know which part is currently being dragged and to ignore any other parts.
Fortunately, Taifun provides a documented solution here.
---
Body.Dragged event block:
In the example above, the Body.Dragged event block has been triggered because the Body part is being dragged.
The if block tests if the Ladder Truck has already been built (which sets the Placed variable value to true)
If so, then we are looking at the rolling scene and should allow the Ladder Truck to move left or right.
To do this the MoveLadderTruck Procedure is called.
If Placed contains false, then the Ladder Truck is still being built so the Dragged Procedure is called to allow the Body part to be dragged to the assembly area (but only if it is the CurrentPart (for sprite cannibalism prevention).
Dragged Procedure:
As mentioned above, dragging sprites over other sprites can cause sprite cannibalism, so the if block in the Dragged Procedure checks if this Part is the CurrentPart (which is the one we want to drag)
If so, we move this part, otherwise we leave it alone.
Note that we use a calculation to center the part under the user's finger. while this is optional it is more natural to the user.
Without the centering they would be dragging the upper left corner of the part (not natural :()
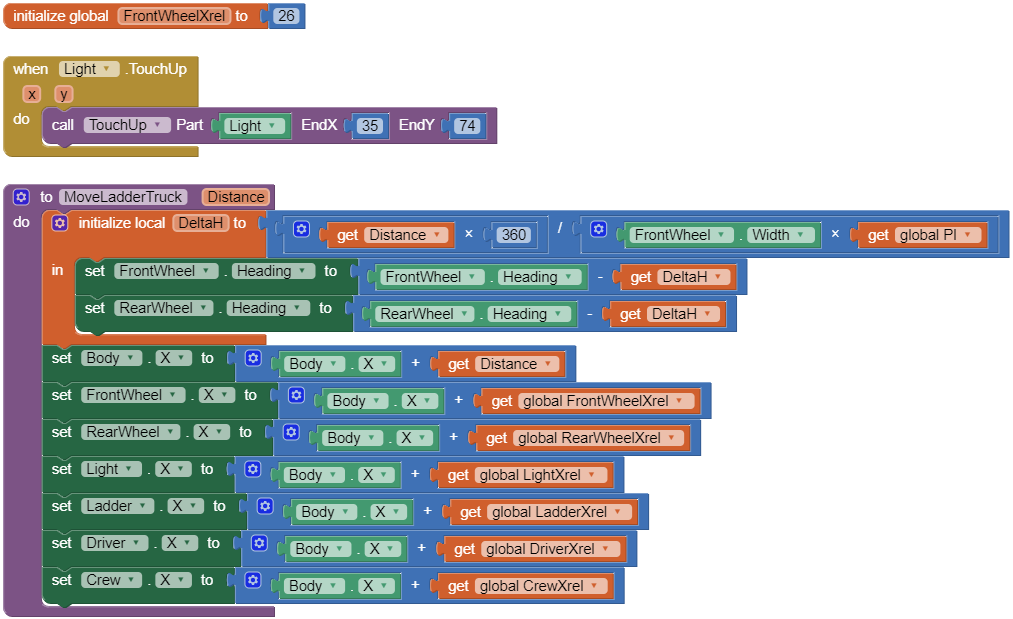
MoveLadderTruck Procedure:
Looking at the MoveLadderTruck Procedure in more detail, it begins with a formula being assigned to the local variable DeltaH.
This formula calculates how much to turn each Ladder Truck wheel based on how far the user has dragged the Ladder Truck Body.
The formula used is the > arc length < formula solved for distance travelled.
Normally arc length is given as the formula:

Where R is the radius of the wheel and C is the angle in degrees that the wheel has turned.
But we need to know how much to turn the wheel based on the distance that the Body has moved.
So we need to solve for C in the formula above:
C = (arc length x 360) / 2πR
Since 2R = diameter, then
C = (arc length x 360) / (diameter x π)
Since 'arc length' = 'distance the wheel will travel' then...
'angle to turn wheel' = ('distance the wheel will travel' x 360) / ('diameter of the wheel' x π)
END of egghead stuff!
So DeltaH contains the angle to turn the wheels based on the distance the user has dragged the Ladder Truck's Body part.
In App Inventor we store the angle of an ImageSprite in the Heading property. (Heading values are in degrees)
So the next two blocks add the new DeltaH angle to each wheel's current Heading angle.
To the user of the app it just looks like the wheels are rolling normally on a flat surface!
So with this simple formula we have just done a rolling wheel simulation :)
The set Body.X to block adds the Distance dragged to the Body.X value to move the Ladder Truck body.
But if we stopped with that, while the body would move, all the other parts would be left behind, so we need to use the global <partname>Xrel values we created earlier (which we calculated in the > Sheet <, remember?) to move the other parts as well.
Now to the user, the whole Ladder Truck has moved.
Body.TouchUp event block:
The Body.TouchUp event block detects that the finger has been lifted.
This may be because the body part was dropped.
This event is handled with a call to the TouchUp Procedure passing the EndX and EndY values from the > Sheet <..
Those values will be used to drop the body part at the correct location in the assembly area of the puzzle scene.
TouchUp Procedure:
Again, to avoid sprite cannibalism, an if block is needed to determine if the body Part is actually the CurrentPart. (hope you got that :)
If not it is ignored.
But if it is the CurrentPart then...
Move the Part (Body in this case) to its EndX, EndY location if it was dropped on the left side of the Canvas.
Otherwise move it back to BeginX, BeginY because it was dropped on the right side of the Canvas.
If the body Part was dropped on the left side of the Canvas and snapped into position, then the PlacedCounter is incremented by 1, a click sound is made, and the FlashLightIfDone Procedure is called.
FashLightIf Done Procedure:
If the PlacedCounter contains a seven, then
All parts have been placed.
The FlashingLight Timer is started to make the light blink.

global Placed is set to true so event blocks from here on out will know that the rolling screen is active now and act accordingly.
Finally the Canvas1.BackgroundImage is set to display the mountain range BackgroundImage called Desert.png.
At this point, what the user sees is the Ladder Truck on the rolling scene BackgroundImage and is able to drag it left or right.
When they touch the parts of the Ladder Truck, the corresponding sound effects play as well.
>>>>>>
Since the TouchDown, Dragged and TouchUp Procedure blocks are shared or reusable by the other six <partname>.TouchDown, <partname>.Draggedand <partname>.TouchUp event blocks, then all that is left to complete this project is to place call blocks to these shared Procedures in each of these six part's event blocks.
<<<<<
---
END


--
Excellant job.
--
Thank you, Sir!
--
this is really great! you put a lot of work into that, very detailed description! congratulations!
--
Excellant job.
--
I really love the development of an app.
Excellant job.
--
Thank you, Sir!
--
this is really great! you put a lot of work into that, very detailed description! congratulations!
--
Excellant job.
--
I really love the development of an app.
Documentation....not so much :)
--
--
This is really very slick Scott... First time I've seen it. Just great!
--
--
I see that your game had attracted my interest to build a similar puzzle game for my project at school.
Would you mind if I ask for the tutorial for the puzzle scene only?
I can't differentiate the blocks for the rolling and puzzle scene.
Thank you for your help. I'm glad to see your posts about other games.
--
The original post at the top of this thread contains a tutorial which goes into great detail already.
--
Now I understand. Thank you sir, your methods are my inspiration to my game. You might want to check my entire game output here: http://ai2.appinventor.mit.edu/#6613874594807808. It is called "Season Safari". I would appreciate your feedbacks. Thank you!
--
I am a student who wisheds to explore the ways in making a drag and drop game. so i was asked by my friends to check this out since it's aim is that of similar to mine. but Im sorry, i am unable to understand some key feature. Especially on the second image, the way that you did the "part". I mean there is no mention of it on the blocks, or any. there is no "initialise globle name part". so would you please be able to clarify that doubt of mine please?
--
See the chapter on procedures in the free book in the Books and Tutorials section of this FAQ: FAQ for Books, Tips, Tutorials on App Inventor 2
Also, you may get faster response if you use that board for further questions. It is the main App Inventor help board. This board is a quiet private library, infrequently attended.
--
댓글 없음:
댓글 쓰기