As you saw on the first example, TinyWebDB can be used to store a text document as a value for a title as a tag. In this example, I'm going to show you how you can use TinyWebDB to create a login screen for your app. Keep in mind that your webDB is not secure; if someone finds out the web address for it, they could easily get the usernames and passwords you're storing on it. It's probably better to use a different type of database. Having said that, let's begin.
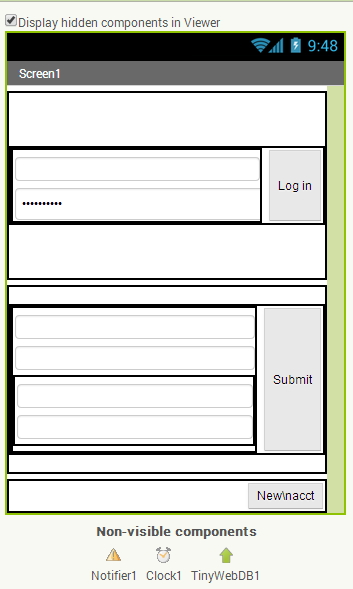
Set the screen scrollable value to false. Two of your vertical arrangements will be used to simulate screens for the user: the login screen and the account-creation/working screen. Inside each of those vertical arrangements we use a horizontal arrangement to place our login and submit buttons next to our textboxes the user will use to either create their account or login to their account. In my screenshot you will notice that I have the fifth horizontal arrangement for the bottom two textboxes of the working screen, though this is unnecessary. Once you get the design screen setup either like mine or to your liking, let's move on to the blocks editor.
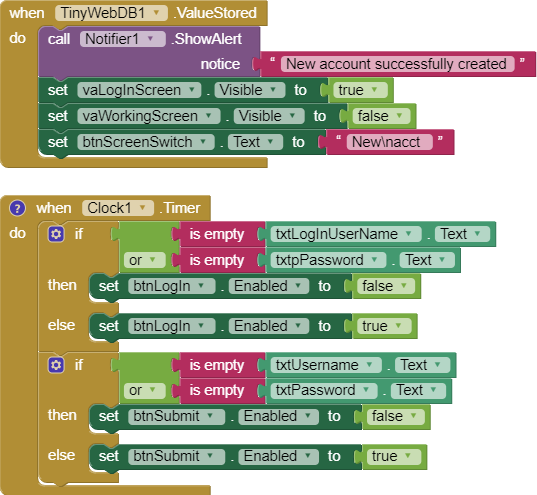
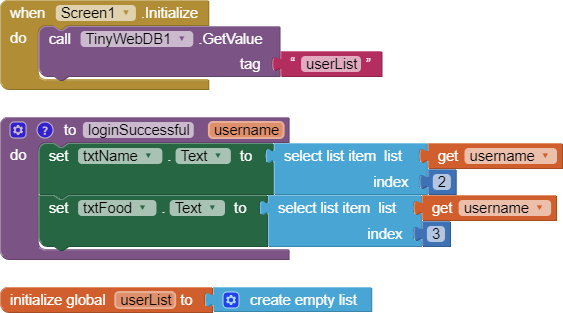
Let's begin with the variable creation and Screen.Initialize event. We need an empty list to hold all the usernames we'll have in the app, and the screen should retrieve the value of this list from the webDB every time the app is run, to make sure we have the most up to date information. The tag for the list should be something that is easily distinguishable, and not going to be overwritten by a username someone may choose, e.g. userList. If you're familiar with most of my tutorials, you'll quickly recognize the Clock.Timer event and it's purposes, but if not, head over to my Fun with the Clock page for an explanation.
The procedure, as it says in the picture, isn't really necessary, but I created it to make the GotValue event just a little less block-heavy; you can choose to eliminate it if you'd like to put these blocks into the GotValue event once we get there. For the ValueStored event, you'll see that we switch back to the login screen everytime someone creates an account, and the text of the screen switch button is changed to allow for the user to switch to the account creation screen if they want to make a new account.
The next step of the process for us will be setting the blocks of the login and screen switch buttons.
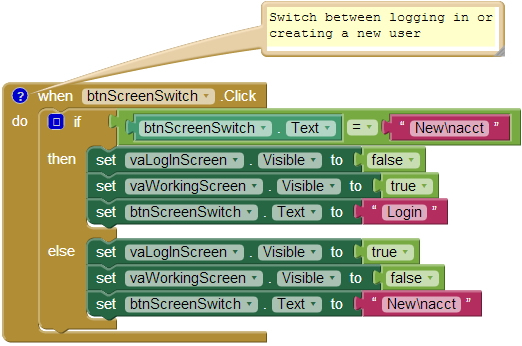

In order to know which screen we're on, we need to check the text of the switch button,and load the opposite screen (arrangement) and change the text to the other value we'll check against. For the login button, we'll be checking the user list we load at screen initialize to see if the username entered into the textbox exists; if it does, we request the login info from the webDB or we tell the user that their username isn't correct. You'll notice in the image to the right that I am using the text trim block on the entered value of the username textbox; this is because the username saved to the database and the list without a space at the end or beginning is not the same as the username with a space at either position.
The next event to setup is the submit button event; the one that creates an account.

This button also checks against the loaded user list and warns the user if the username they picked is already in use. If it's not in the list, we will create the account. The first step is to add the username to the list and then update the webDB tag for the list. After we update the list, we create the new tag and value pair for the user. The username will become the tag, and the values entered into the textboxes will be a list of values under the username tag. You might have noticed the select list item blocks in the procedure earlier; this is why they exist. Their indices are specific to these values we're saving for the user; if the positions change here, they have to be changed in that procedure (or the GotValue event).
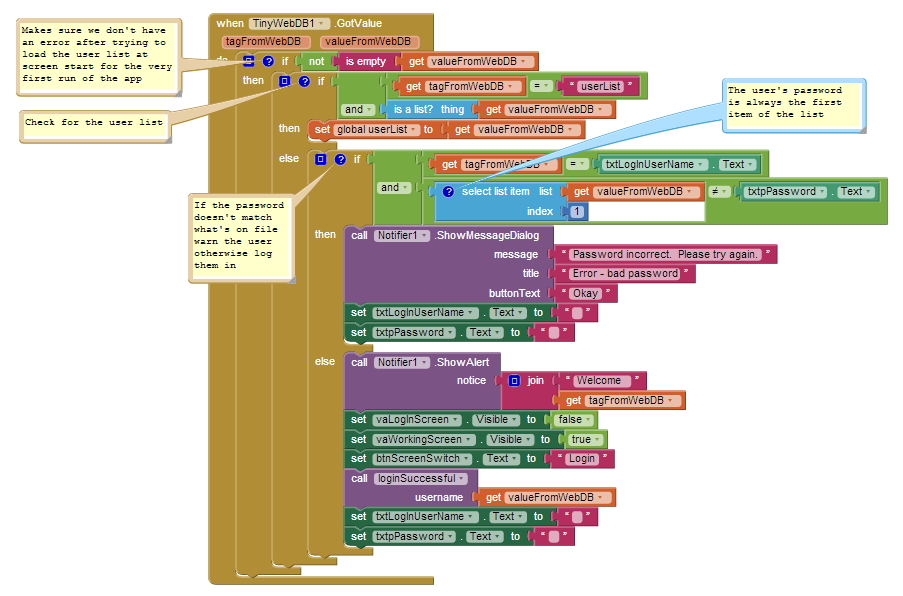
The last and final piece of the puzzle is really the meat and potatoes of this app: the TinyWebDB.GotValue event. The first thing we want to do is prevent there from being any runtime errors when the screen loads, so we need an if statement here to check that the value of the tag retrieved is not empty. We won't be using an else portion because if it is empty we just won't do anything. If it's not empty, we need to see if the data being requested is from the screen initialize event and load the user list into the app. The is a list? check I have in there might be superfluous, but it's just to be entirely sure that there won't be a runtime error if we try to check a name in a list that isn't a list. If the tag is userList and the value is a list, we load the global variable with the list of users, else we will do our login check. In order to login to the app, the user must have entered a valid username and the password associated with it. The password (as I have the blocks setup) is always the first item of the list of data saved for the username tag. If the value entered into the password textbox is not the same as the first list item of the value retrieved from the webDB then either the username or the password has been entered incorrectly and they need to retry so we give them a notification error and reset the textboxes.
Once we've checked that the username and password are correct, we can load the data for the user from the webDB.


Components and design
We need the following components for this app:
⦁ 3 buttons
⦁ 5 textboxes
⦁ 1 password textbox
⦁ 1 clock
⦁ 1 TinyWebDB
⦁ 5 vertical arrangements (1 optional)
⦁ 3 horizontal arrangements
⦁ 1 Notifier
We need the following components for this app:
⦁ 3 buttons
⦁ 5 textboxes
⦁ 1 password textbox
⦁ 1 clock
⦁ 1 TinyWebDB
⦁ 5 vertical arrangements (1 optional)
⦁ 3 horizontal arrangements
⦁ 1 Notifier
Set the screen scrollable value to false. Two of your vertical arrangements will be used to simulate screens for the user: the login screen and the account-creation/working screen. Inside each of those vertical arrangements we use a horizontal arrangement to place our login and submit buttons next to our textboxes the user will use to either create their account or login to their account. In my screenshot you will notice that I have the fifth horizontal arrangement for the bottom two textboxes of the working screen, though this is unnecessary. Once you get the design screen setup either like mine or to your liking, let's move on to the blocks editor.
Blocks

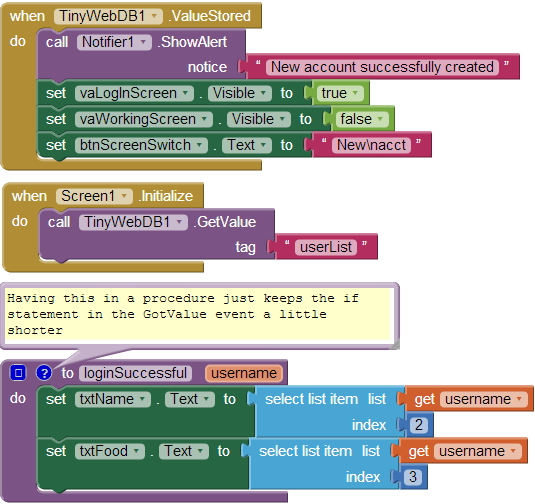
Let's begin with the variable creation and Screen.Initialize event. We need an empty list to hold all the usernames we'll have in the app, and the screen should retrieve the value of this list from the webDB every time the app is run, to make sure we have the most up to date information. The tag for the list should be something that is easily distinguishable, and not going to be overwritten by a username someone may choose, e.g. userList. If you're familiar with most of my tutorials, you'll quickly recognize the Clock.Timer event and it's purposes, but if not, head over to my Fun with the Clock page for an explanation.
The procedure, as it says in the picture, isn't really necessary, but I created it to make the GotValue event just a little less block-heavy; you can choose to eliminate it if you'd like to put these blocks into the GotValue event once we get there. For the ValueStored event, you'll see that we switch back to the login screen everytime someone creates an account, and the text of the screen switch button is changed to allow for the user to switch to the account creation screen if they want to make a new account.
The next step of the process for us will be setting the blocks of the login and screen switch buttons.
In order to know which screen we're on, we need to check the text of the switch button,and load the opposite screen (arrangement) and change the text to the other value we'll check against. For the login button, we'll be checking the user list we load at screen initialize to see if the username entered into the textbox exists; if it does, we request the login info from the webDB or we tell the user that their username isn't correct. You'll notice in the image to the right that I am using the text trim block on the entered value of the username textbox; this is because the username saved to the database and the list without a space at the end or beginning is not the same as the username with a space at either position.
The next event to setup is the submit button event; the one that creates an account.
This button also checks against the loaded user list and warns the user if the username they picked is already in use. If it's not in the list, we will create the account. The first step is to add the username to the list and then update the webDB tag for the list. After we update the list, we create the new tag and value pair for the user. The username will become the tag, and the values entered into the textboxes will be a list of values under the username tag. You might have noticed the select list item blocks in the procedure earlier; this is why they exist. Their indices are specific to these values we're saving for the user; if the positions change here, they have to be changed in that procedure (or the GotValue event).
The last and final piece of the puzzle is really the meat and potatoes of this app: the TinyWebDB.GotValue event. The first thing we want to do is prevent there from being any runtime errors when the screen loads, so we need an if statement here to check that the value of the tag retrieved is not empty. We won't be using an else portion because if it is empty we just won't do anything. If it's not empty, we need to see if the data being requested is from the screen initialize event and load the user list into the app. The is a list? check I have in there might be superfluous, but it's just to be entirely sure that there won't be a runtime error if we try to check a name in a list that isn't a list. If the tag is userList and the value is a list, we load the global variable with the list of users, else we will do our login check. In order to login to the app, the user must have entered a valid username and the password associated with it. The password (as I have the blocks setup) is always the first item of the list of data saved for the username tag. If the value entered into the password textbox is not the same as the first list item of the value retrieved from the webDB then either the username or the password has been entered incorrectly and they need to retry so we give them a notification error and reset the textboxes.
Once we've checked that the username and password are correct, we can load the data for the user from the webDB.
So they know that they have logged in, we'll greet them with a toast message at first, then swap screens and load their data into the app. Then we'll just set the login screen textboxes to blank and we're done.
You can download the source code below. Happy App Inventor-ing!
댓글 없음:
댓글 쓰기